When it comes to your YouTube thumbnail, the magic numbers are 1280 x 720 pixels. Getting the right size for a YouTube thumbnail is your first, best chance to make a great impression. It tells the YouTube algorithm and potential viewers that your content is polished and professional before they even think about hitting play.
Think of your thumbnail as the cover of a book on a crowded shelf. A blurry, pixelated, or poorly cropped image is like a torn, coffee-stained cover—people will just skip right over it. You want something that looks sharp, clear, and inviting to improve your video’s performance in YouTube search.
Mastering the Core Thumbnail Specs
To make sure your thumbnail pops on every screen, from a tiny phone to a huge smart TV, you need to stick to YouTube’s guidelines.
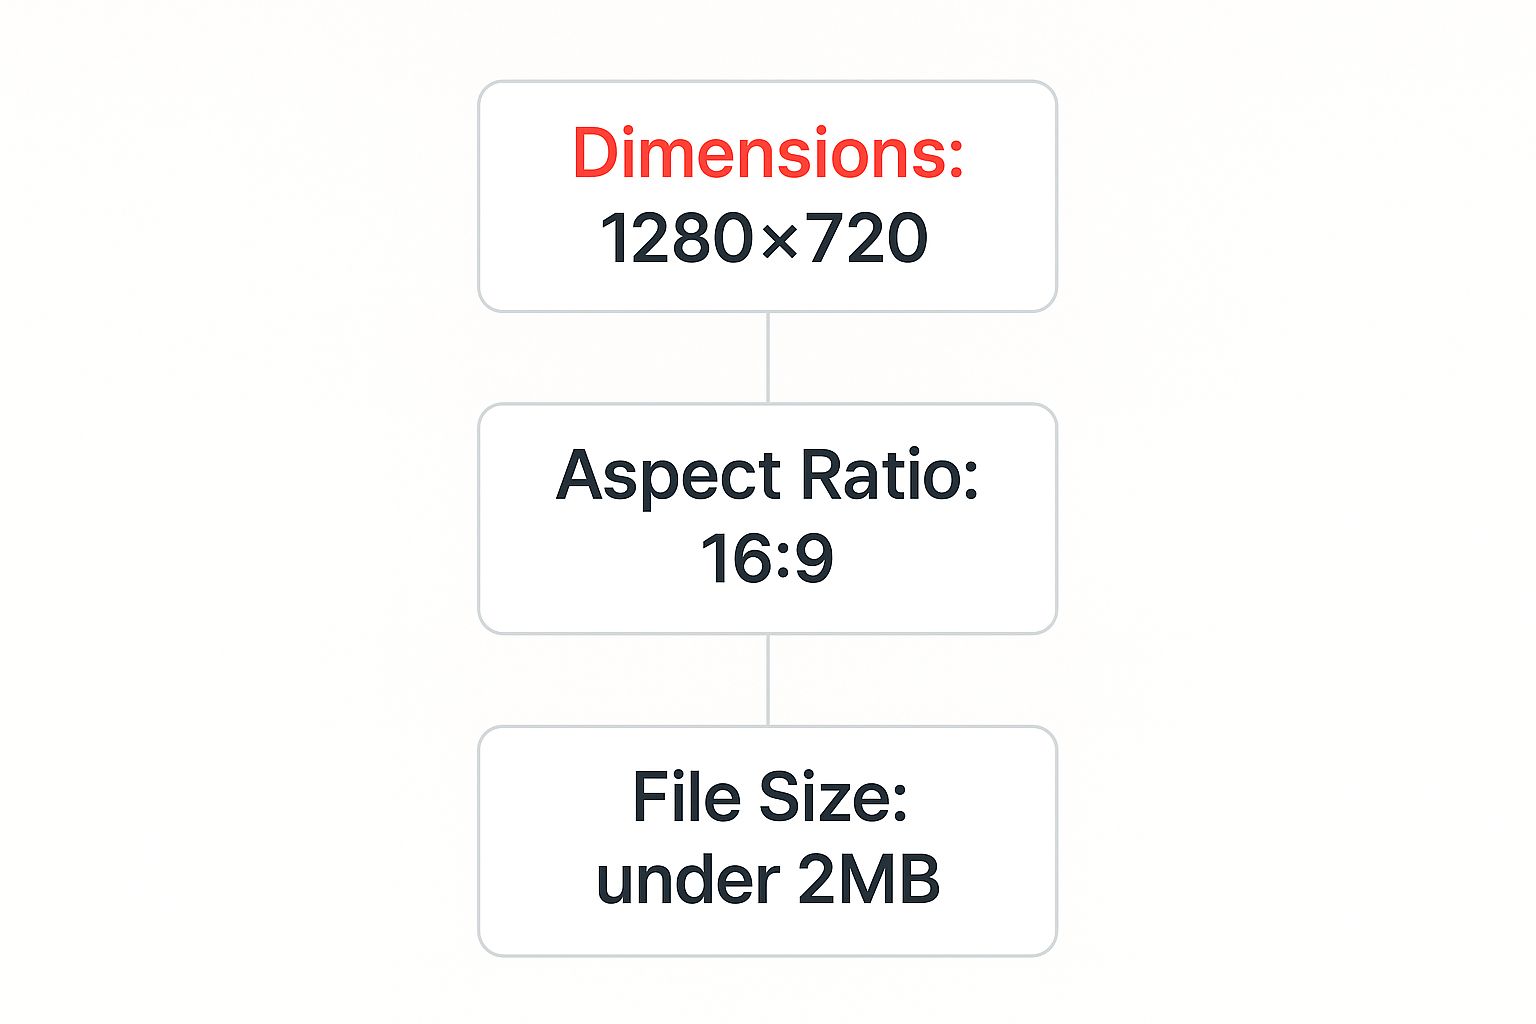
The most critical rule is the dimension: 1280 pixels wide by 720 pixels tall. This isn’t just a random number; it’s the key to a crisp, high-definition look that the YouTube algorithm favors.
This size also locks in the perfect 16:9 aspect ratio, which is the exact same shape as the YouTube video player. When your thumbnail matches the player, you avoid those ugly black bars on the sides or a stretched-out, distorted image. It’s a small detail that makes a huge difference in looking professional. For a more detailed breakdown, you can explore our complete guide on YouTube thumbnail size.
File Size and Format
Besides the dimensions, YouTube also wants your thumbnail file to be lightweight. The maximum file size is 2 MB. This ensures your thumbnail loads instantly, even for viewers with slower connections, without sacrificing too much quality.
Finally, you’ll want to save your image in one of the approved formats. The most common and reliable choices are:
- JPG
- GIF
- PNG
- BMP
Most creators stick with JPG or PNG, as they offer the best balance of quality and file size. A clear, optimized thumbnail is a simple yet powerful strategy to get your content noticed.
Quick-Reference Cheat Sheet
Feeling overwhelmed by the numbers? Don’t be. Here’s a simple table with everything you need to know at a glance.
YouTube Thumbnail Technical Specifications
| Specification | Recommendation |
|---|---|
| Dimensions | 1280 x 720 pixels |
| Aspect Ratio | 16:9 |
| File Size | Under 2 MB |
| File Formats | JPG, PNG, GIF, or BMP |
Bookmark this page or save this table! Getting these four technical details right is the foundation for every great thumbnail you’ll ever create. It’s a simple, repeatable process that sets your videos up for success.
Why Your Thumbnail Size Is a Secret Weapon for More Views
Think of your YouTube thumbnail as more than just a preview image. It’s your video’s digital billboard, the very first thing that has to grab a viewer’s attention. Treating it like an afterthought is one of the biggest mistakes a creator can make, because getting the size for a YouTube thumbnail right is what separates the videos that get clicks from the ones that get ignored in YouTube search results.
When you upload a crisp, clear image designed at the proper size, you’re sending a powerful message. It screams professionalism and hints at the quality of the video itself. This simple detail can be the deciding factor that makes someone choose your video over a dozen others.
First Impressions Really Do Count
YouTube has allowed custom thumbnails for a long time, but it’s only in the last several years that creators have truly understood their power. In fact, some studies show that videos with a great custom thumbnail can pull in 154% more views than those that just settle for a random, auto-generated freeze-frame from the video. That number alone should tell you everything you need to know.
This isn’t just about appealing to viewers; it’s also about signaling your seriousness to the YouTube algorithm.
A sharp, properly sized thumbnail tells YouTube that you’re a creator who cares about quality. This can lead to better visibility across the platform and is a huge piece of the puzzle for improving your video’s click-through rate (CTR).
A higher CTR is one of the strongest signals you can send to YouTube that people find your content appealing. This, in turn, can lead to your video being shown to even more people, creating a snowball effect of views. If you’re looking to dive deeper, we have a whole guide on mastering your YouTube click-through rate.
Ultimately, the time you invest in getting this one small asset right pays off big time. By focusing on the correct size and quality, you’re not just uploading a picture—you’re arming your video with a secret weapon for success.
Understanding the 16:9 Aspect Ratio
https://www.youtube.com/embed/ixEXoHnPEOI
That phrase “16:9 aspect ratio” might sound a little technical, but it’s actually a simple idea that’s absolutely essential for getting your size for a YouTube thumbnail just right.
Think of it like this: your thumbnail is a rectangle, and the aspect ratio just describes the specific shape of that rectangle. The 16:9 ratio is the standard widescreen format you see everywhere—it perfectly matches the YouTube video player and the screens on most modern phones, computer monitors, and TVs. If you want your channel to look professional, sticking to this shape isn’t optional.
Why It’s So Important to Get This Right
So, what happens if you just upload any old image? Well, YouTube is still going to force it into that 16:9 frame, one way or another. This usually leads to one of two pretty ugly results:
- Letterboxing: Your image gets squeezed, and YouTube adds black bars to the top and bottom (or sides) to fill the empty space.
- Stretching and Cropping: Your image gets distorted to fit, or it’s awkwardly cropped, potentially cutting off vital parts of your design like your face or important text.
Either way, the final product screams “amateur.” It creates a jarring first impression that can erode a viewer’s trust before they even think about clicking on your video.
By respecting the 16:9 standard, you’re making sure your video is presented in the most polished and engaging way possible. It creates a seamless, professional experience for your audience from the very first glance.
The 16:9 aspect ratio for YouTube thumbnails simply reflects how dominant widescreen video has become. In fact, according to YouTube’s own recommendations, thumbnails designed at the ideal 1280×720 pixel size (which is a perfect 16:9 ratio) perform best across every device and embedded player. This ensures your hard work looks exactly how you designed it, no matter where it’s seen.
Want to get a head start and see what your competitors are doing? The free Thumb Scout Chrome Extension lets you easily check out their designs. You can also use Thumb Scout to analyze what’s working best in your specific niche.
Getting the File Format and Size Just Right
Alright, you’ve nailed the perfect 1280×720 dimensions and the all-important 16:9 aspect ratio. We’re almost there! The last piece of the puzzle is picking the right file format and making sure your image isn’t too chunky for YouTube’s system.
Getting these final technical details right ensures your thumbnail uploads without a hitch and looks sharp on the platform.

YouTube gives you a few options, but the main players are JPG and PNG. So, which one is for you? It really just comes down to what your thumbnail looks like.
- Go with JPG for photos: If your thumbnail is based on a photograph—something with lots of different colors and gradients—JPG is your best bet. It does an amazing job of compressing the image to keep the file size down without making it look fuzzy.
- Pick PNG for graphics and text: Is your design heavy on bold text, logos, or crisp lines? Or maybe you need a transparent background? Then PNG is the clear winner. It keeps those sharp edges looking perfect, something JPGs can struggle with.
Staying Under the 2MB Limit
Here’s the one hard rule you can’t ignore: YouTube has a strict 2 MB file size limit for thumbnails. This isn’t just to be difficult; it helps keep the entire site running fast for everyone, no matter their internet connection. If your file is over that limit, YouTube simply won’t let you upload it.
Don’t sweat it, though. Staying under 2 MB is usually pretty easy.
Nearly all photo editing programs have a “Save for Web” or “Export” function. This lets you tweak the quality setting to shrink the file size. If you need a quick fix, free online tools like TinyPNG are fantastic—they’ll compress your image in a flash without any obvious drop in quality. It’s a great final check before you hit upload.
Curious how the pros manage to create stunning thumbnails while staying under that 2 MB cap? Check out the Thumb Scout Chrome Extension to see what file types and sizes top creators are using. You can also dive deeper into what’s working in your niche over at the main Thumb Scout site. It’s a great way to see real-world examples of the perfect technical size for a YouTube thumbnail.
Common Thumbnail Size Mistakes to Avoid
Getting the perfect size for a YouTube thumbnail is a massive first step, but it’s surprisingly easy to trip up on a few common mistakes that can undo all your hard work. Let’s walk through a friendly checklist of the most frequent slip-ups so you can make sure your video’s first impression is a great one.
One of the biggest blunders we see is uploading a low-resolution image. While YouTube’s absolute minimum width is 640 pixels, using an image that small is asking for trouble. It might look okay on a tiny screen, but when it’s blown up on a laptop or a TV, it turns into a blurry, pixelated mess that just screams “amateur.”
Another classic mistake is ignoring the 16:9 aspect ratio. If you upload a square or vertical photo, YouTube has to make a choice: either slap ugly black bars on the sides to make it fit, or crop your image in a really awkward way. Either way, it looks unprofessional and can chop off important parts of your design.
Critical Design and Readability Errors
Beyond the technical specs, some design choices can be just as damaging. A huge one is cramming way too much tiny text into the thumbnail.
Remember, your thumbnail will often be viewed on a small mobile screen. If viewers have to squint to read your message, they won’t bother—they’ll just keep scrolling.
Here are a few more mistakes to keep on your radar:
- Irrelevant or Misleading Images: Using clickbait that has nothing to do with your actual video is a surefire way to annoy your audience. It might get a click, but it can tank your watch time and damage your channel’s reputation.
- Poor Color Contrast: If your text and subject blend into the background, your thumbnail will be invisible in a crowded feed. You need bold, contrasting colors that pop and grab attention instantly.
- Ignoring File Format: Don’t just save your file without thinking. Saving a detailed graphic as a low-quality JPG can create weird, blocky artifacts. On the flip side, saving a simple photo as a massive PNG might push you over the 2 MB file size limit.
By sidestepping these simple yet costly errors, you give your thumbnail its best shot at being both technically sound and visually magnetic. Need some inspiration? Check out these excellent YouTube thumbnail examples to see what the pros are doing right.
Common Questions I Hear About Getting Thumbnail Sizes Right
I get it. Even with all the specs laid out, you might still have a few nagging questions. Let’s tackle some of the most common ones I hear from creators so you can move forward with total confidence.
1. What happens if my thumbnail isn’t 1280×720?
If it’s smaller, YouTube has to stretch it, which makes it look blurry and unprofessional. If it’s bigger but still a 16:9 ratio (like 1920×1080), you’re perfectly fine—YouTube will just shrink it down. The real problem is a wrong aspect ratio (like a square image), which causes ugly black bars or awkward cropping.
2. Does the 2MB file size limit really matter?
Yes, it’s a non-negotiable rule. If your file is over 2MB, YouTube will reject the upload. This keeps the platform fast for everyone. Most editing tools have a “Save for Web” option to help you easily stay under the limit. To see how top creators balance quality and file size, try the free Thumb Scout Chrome extension.
3. I’m not a designer. What’s the easiest way to make a good thumbnail?
You don’t need to be! Use free tools like Canva or Adobe Express. They have pre-made templates already set to the perfect 1280×720 size. Just drop in your own image, change the text, and you’re good to go. It’s a great starting point.
4. Should I use JPG or PNG for my thumbnails?
Simple rule of thumb: use JPG for photos and images with lots of colors. Use PNG for graphics with sharp lines, text, or if you need a transparent background. Both work great, so just pick the one that makes your specific design look best.
5. Why do some thumbnails have the bottom-right corner cut off?
That’s where YouTube places the video length timestamp (e.g., “10:35”). It’s a key strategy to avoid putting important text or faces in that corner, or they’ll be covered up. Always design with that little black box in mind.
6. Can I change a thumbnail after I’ve published a video?
Absolutely! You can update your thumbnail at any time through the YouTube Studio. If a video isn’t performing well, swapping in a new thumbnail is a powerful and easy strategy to try and boost its views. You can analyze competitor thumbnails for inspiration with Thumb Scout.
Learning how to get more views on YouTube videos starts with getting the fundamentals right. Want to see what thumbnails are actually working for top channels in your niche? Get real-time performance data directly on YouTube and start making smarter design decisions today. Check out Thumb Scout now!