
It's surprisingly easy to change your thumbnail right inside YouTube Studio. When you're uploading a new video, you'll see the option on the "Details" screen. For a video that's already live, just head to Content > Details and find the "Thumbnail" section.
This simple tweak is one of the single most powerful things you can do to get more views. Seriously.
Why Thumbnails Are Your Most Important Click-Getting Tool
Before we get into the nuts and bolts, let's talk about why your thumbnail is such a big deal. Think of it as the digital billboard for your video. In a sea of endless scrolling, your thumbnail is often the one thing that convinces someone to click on your video instead of someone else's.
It's just like a book cover. It has to set expectations, create a little intrigue, and promise the viewer they're about to see something valuable. This first impression is directly linked to your Click-Through Rate (CTR), a metric the YouTube algorithm pays very close attention to.
A high CTR tells YouTube that people find your video relevant and interesting, which makes the algorithm want to show it to even more people. To really wrap your head around this, check out our deep dive on the YouTube click-through rate and how to boost it.
Beyond Auto-Generated Options
Sure, YouTube will offer you a few auto-generated thumbnails from random frames in your video. But trust me, relying on those is a huge missed opportunity. The top creators never leave this to chance—they treat their thumbnails like a strategic hook.
The proof is in the numbers: an incredible 90% of the best-performing videos on the platform use custom thumbnails. Why? Because a custom image gives you complete control over the story you're telling. See what's working in your niche by analyzing top-performing thumbnails with Thumb Scout.
One of the most effective strategies I've seen—backed by research from the YouTube Creator Academy—is to use human faces showing clear emotions. This simple addition can boost CTR by 20–30% because it creates an instant, subconscious connection with the viewer. You can find more practical tips for creating great thumbnails over at Nearstream.
Quick Guide to Changing Your YouTube Thumbnail
To make it even clearer, here’s a quick-glance summary of the core steps for changing a thumbnail on both new and existing videos.
| Action | For a New Video | For an Existing Video |
|---|---|---|
| Go to YouTube Studio | Start uploading your video file. | From your dashboard, click Content in the left menu. |
| Find the Thumbnail Section | On the Details page, scroll down to the "Thumbnail" section. | Click the pencil icon (Details) on the video you want to edit. |
| Upload Your Image | Click Upload thumbnail. | Find the "Thumbnail" section and click the three-dot menu, then Change. |
| Select and Save | Choose your custom thumbnail file from your computer. | Select your new image file. |
| Finalize | Continue with the upload process and click Save. | Click Save in the top-right corner of the screen. |
At the end of the day, knowing how to change a thumbnail isn't just a technical skill; it’s a fundamental part of your marketing strategy. It's your single best shot at earning that all-important first click, which leads to more watch time and better performance in the algorithm.
And if you ever need a little inspiration, you can grab high-res thumbnails from any video with the Thumb Scout Chrome Extension.
Want Custom Thumbnails? First, You Have to Verify Your Account
Ever logged into YouTube Studio, ready to upload the perfect thumbnail, only to find the "Upload thumbnail" button is grayed out? It’s a classic roadblock for new creators, but thankfully, the fix is simple. You just need to verify your YouTube account.
Think of it as YouTube's way of getting a digital handshake. They just want to confirm you're a real human, which is a crucial step in their fight against spam and bots. It's a one-time thing, and if you're serious about your channel, it's non-negotiable.
Verification Unlocks More Than Just Thumbnails
Getting your account verified does more than just let you change a video thumbnail on YouTube. It’s actually the key to a whole suite of essential creator tools.
Once you're verified, you can also:
- Upload videos longer than 15 minutes
- Go live and stream directly to your audience
- Appeal Content ID claims
It’s the first real step toward treating your channel like a business. Honestly, it’s the very first box you should check.
Verification is the difference between being stuck with YouTube’s awkward, auto-generated stills and being able to upload a carefully crafted image designed to get clicks. Don't skip this. It's foundational.
How to Get Your Account Verified
Ready to knock this out? It only takes a minute.
Just head over to youtube.com/verify. From there, YouTube will ask for your country and a phone number. You can choose to get your verification code via a text message or an automated voice call—whichever works for you.
Pop that code into the box on the screen, and you're good to go. The custom thumbnail feature should light up in your YouTube Studio almost instantly, and you'll be ready to upload visuals that do your content justice. If you're looking for some inspiration, you can always grab ideas with the Thumb Scout Chrome Extension.
Alright, let's give this section a more human touch, as if it's coming from someone who's spent countless hours in YouTube Studio.
Adding a Thumbnail to a Brand New Video
This is one of the best habits you can get into as a creator. Adding your custom thumbnail the moment you upload a new video means it’s ready to make a killer first impression from the second it goes live. You’ll be maximizing that crucial initial push. The good news is, you can do this right from the main upload screen in YouTube Studio.
Once you've dragged your new video file into Studio, you’ll be on the Details page. While you’re crafting that perfect title and description, just scroll down a little bit. You’ll see the “Thumbnail” section waiting for you.
YouTube will offer you a few random, often awkward-looking frames from your video. You can pretty much ignore those. Your eyes should go straight to the Upload thumbnail button.
Getting Your Thumbnail Specs Right
Before you even think about uploading, you need to make sure your image is good to go. I’ve learned the hard way that having to go back and resize an image is a real workflow killer.
Make sure your thumbnail file meets these specs:
- Resolution: 1280×720 pixels, which is the standard 16:9 aspect ratio.
- File Format: JPG, GIF, or PNG are all fine.
- File Size: Keep it under the 2MB limit.
My best advice? Get your thumbnail designed and saved before you even start uploading your video. Have that file sitting on your desktop, ready to go. It makes the whole process so much smoother and less stressful.
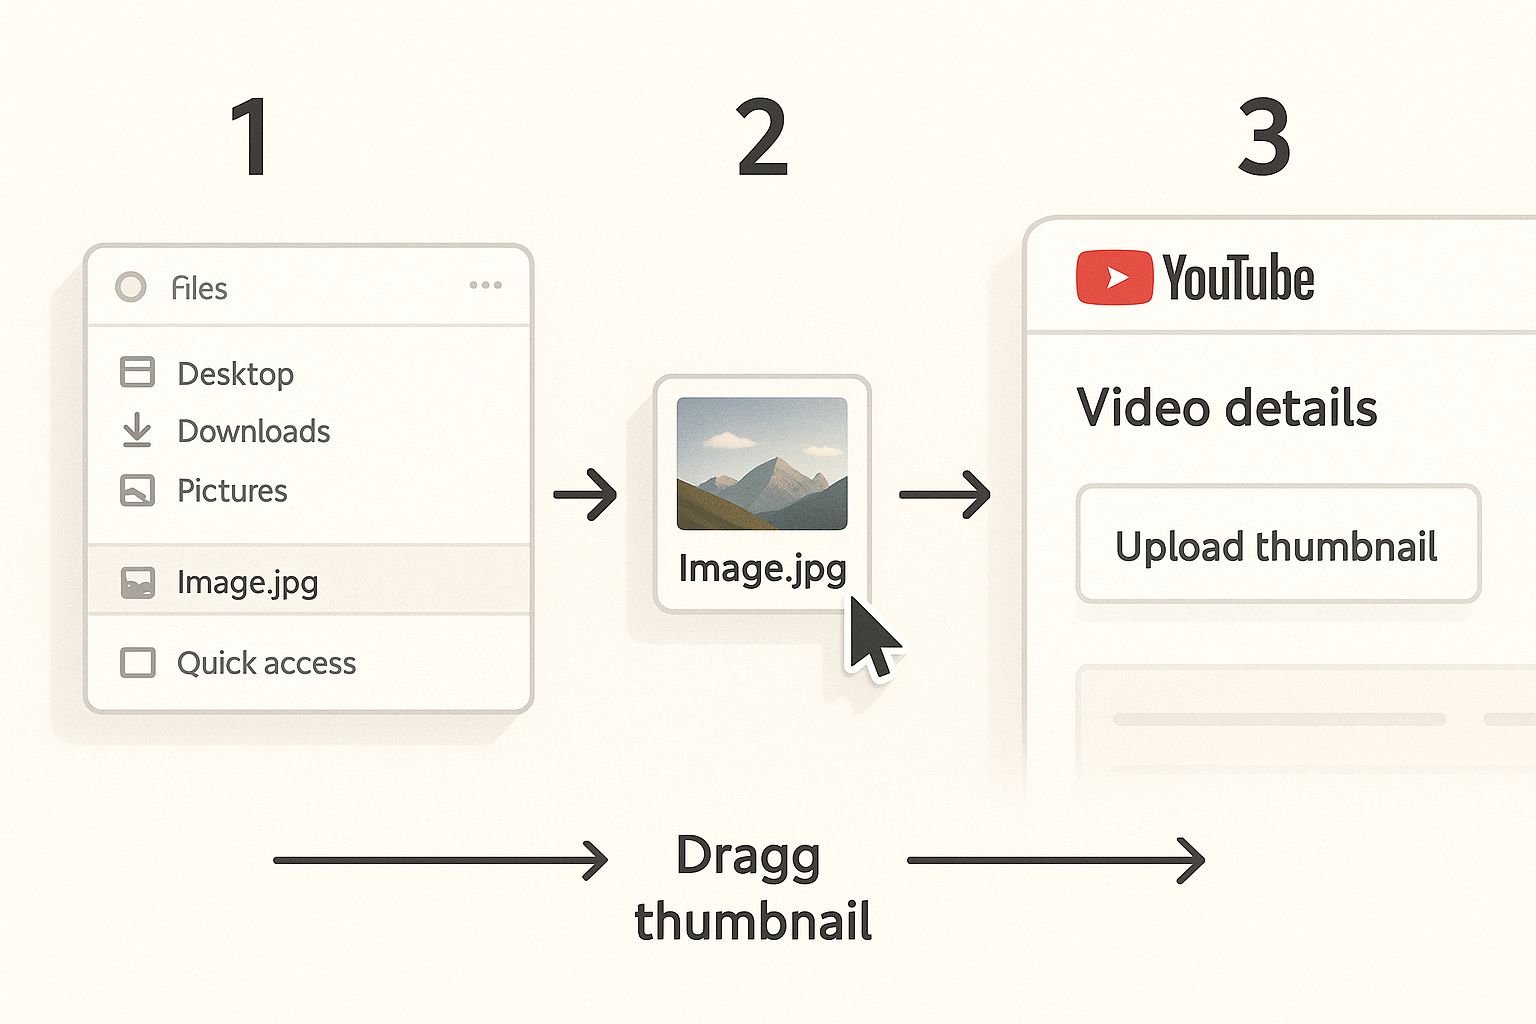
Here's what that upload spot looks like in action. It's a simple drag-and-drop or click-to-select.
Making this part of your routine is a game-changer. It’s a small step that ensures every video you launch has the best possible chance of success right out of the gate.
Just select your finished file, and bam—your video now has a professional, eye-catching billboard designed to get clicks. If you’re ever stuck for ideas or want to see what's actually working in your niche, a tool like Thumb Scout can be incredibly helpful for seeing real-world performance data.
How to Update a Thumbnail on an Existing Video
Ever have an older video that just seems… stuck? You know the content is good, but it's just not getting the clicks it deserves. I've been there. A quick thumbnail refresh can be the single most effective thing you do to give that video a second life.
It's a surprisingly simple process. First, pop into your YouTube Studio and find the Content tab on the left-hand side. This is your library of every video you've ever published.
From there, find the video you want to breathe new life into. As you hover your mouse over it, a few little icons will show up. You're looking for the pencil icon—that's the Details button. Clicking it takes you right back to the main editing screen, the same one you saw when you first uploaded.
Finding the Thumbnail Section
Once you're on the video's Details page, just scroll down a bit. You can't miss the "Thumbnail" section.
Your current thumbnail will be sitting there. To swap it out, click the three-dot menu icon that appears on the thumbnail and choose Change. Your computer's file browser will open up, ready for you to pick your shiny new thumbnail.
Just a reminder: make sure your new image sticks to the ideal YouTube thumbnail size of 1280×720 pixels. This ensures it looks crisp and professional everywhere on the platform.
This isn't just about making things look pretty. If a video is suffering from a low Click-Through Rate (CTR), a fresh thumbnail is your best bet for convincing both viewers and the YouTube algorithm to give your content another look.
After you select your new file, you'll see the preview update right away. The final, crucial step is to hit that blue Save button in the top-right corner of the screen. And that's it! Your video now has a brand new billboard.
If you need some inspiration for what a high-performing thumbnail looks like in your niche, the Thumb Scout Chrome Extension is a fantastic tool for grabbing high-res thumbnails from any video for analysis.
Designing Thumbnails That Actually Get Clicks
Alright, so you know the technical steps to upload a thumbnail. That’s the easy part. The real magic—and where you’ll see your channel grow—is in mastering the art of making a thumbnail that people can't resist clicking.
Your mission is to create a tiny billboard that stops someone dead in their tracks while they're scrolling through a sea of other videos. This almost always starts with a bold, high-contrast design.
Think bright, eye-catching backgrounds paired with a crystal-clear subject. And whenever possible, include an expressive human face. We are naturally wired to lock onto faces, especially those showing a strong, clear emotion like shock, excitement, or intense curiosity. It forges an instant connection that a boring product shot or a generic landscape simply can't compete with.
Text That Complements, Not Clutters
When you add text to your thumbnail, remember this: less is more. Way more. The text isn't there to repeat your video's title. It’s a short, punchy hook designed to spark curiosity and get that click.
- Stick to 1-4 words max. Keep it big, bold, and incredibly easy to read.
- Make sure the text has extreme contrast with the background. It needs to be legible even when it's shrunk down to the size of a postage stamp on a phone screen.
- Try asking a question or using a "power word" that packs a punch, like "Secret," "Finally," or "Warning."
Your thumbnail and title should work together like a one-two punch. The thumbnail grabs the eye, and the title provides the context that secures the click. They shouldn't be redundant; they should be complementary.
Want to see what the biggest creators in your space are doing right this second? Use Thumb Scout to get an inside look at the visuals that are winning in your niche.
The entire creative process is evolving, too. Artificial Intelligence (AI) is quickly changing how creators think about and design their thumbnails. In fact, some studies show that 72% of creators are already using AI-generated thumbnails or AI-assisted tools to get an edge. A well-designed thumbnail can boost a video's Click-Through Rate (CTR) by up to 30%, which shows you just how powerful this tiny image is. If you're curious about this trend, you can read the full research about AI in thumbnail creation.
At the end of the day, the best way to get good at this is to start making them. If you want a full A-to-Z walkthrough, you can check out our guide on how to make a thumbnail from scratch.
Experiment with different styles, see what’s performing best for others using a tool like the Thumb Scout Chrome Extension, and slowly but surely, you’ll develop a visual style that’s uniquely yours.
Common Questions I Hear About Getting More Clicks
Over the years, I've seen the same questions about thumbnails pop up again and again. Let's run through some of the most common ones I get from creators. Think of this as your personal cheat sheet for those little sticking points that can be so frustrating.
Why can't I upload a custom thumbnail?
This is a classic! The answer is almost always the same: your account isn't verified yet. To unlock the custom thumbnail feature, YouTube needs you to confirm you're a real person by verifying your account with a phone number. Just go to youtube.com/verify to fix it in minutes.
How long does it take for a new thumbnail to show up?
Usually, it’s almost instant. But don't panic if you don't see it everywhere right away. Sometimes it can take a few minutes (or even an hour) for the change to appear across all of YouTube, especially in search results or on embedded players.
Does changing a thumbnail on an old video actually work?
Absolutely. This is one of my favorite strategies for reviving a video with a low click-through rate (CTR). A fresh, eye-catching thumbnail can make the YouTube algorithm see your old content in a new light, giving it a second chance to find an audience. For real-time feedback, Thumb Scout can show you performance scores right on the YouTube page.
What is the best size for a YouTube thumbnail?
The magic numbers are 1280×720 pixels (a 16:9 aspect ratio). Also, keep the file size under 2MB. This ensures your thumbnail looks crisp and professional everywhere, from a phone screen to a TV.
Can I just use a frame from my video?
You can, but I almost always advise against it. An auto-generated frame rarely has the same impact as a thumbnail designed to grab attention. A custom image gives you full control over the composition, text, and emotion needed to earn that click.
How do I know if my thumbnail is good?
The ultimate test is your click-through rate (CTR). A "good" CTR is typically between 4% and 5%. If you can get into the 6% to 10% range, you're doing great. To see how your thumbnails compare, install the Thumb Scout Chrome Extension to analyze what's working for top creators in your niche.